Last Updated on April 28, 2025 by Toya
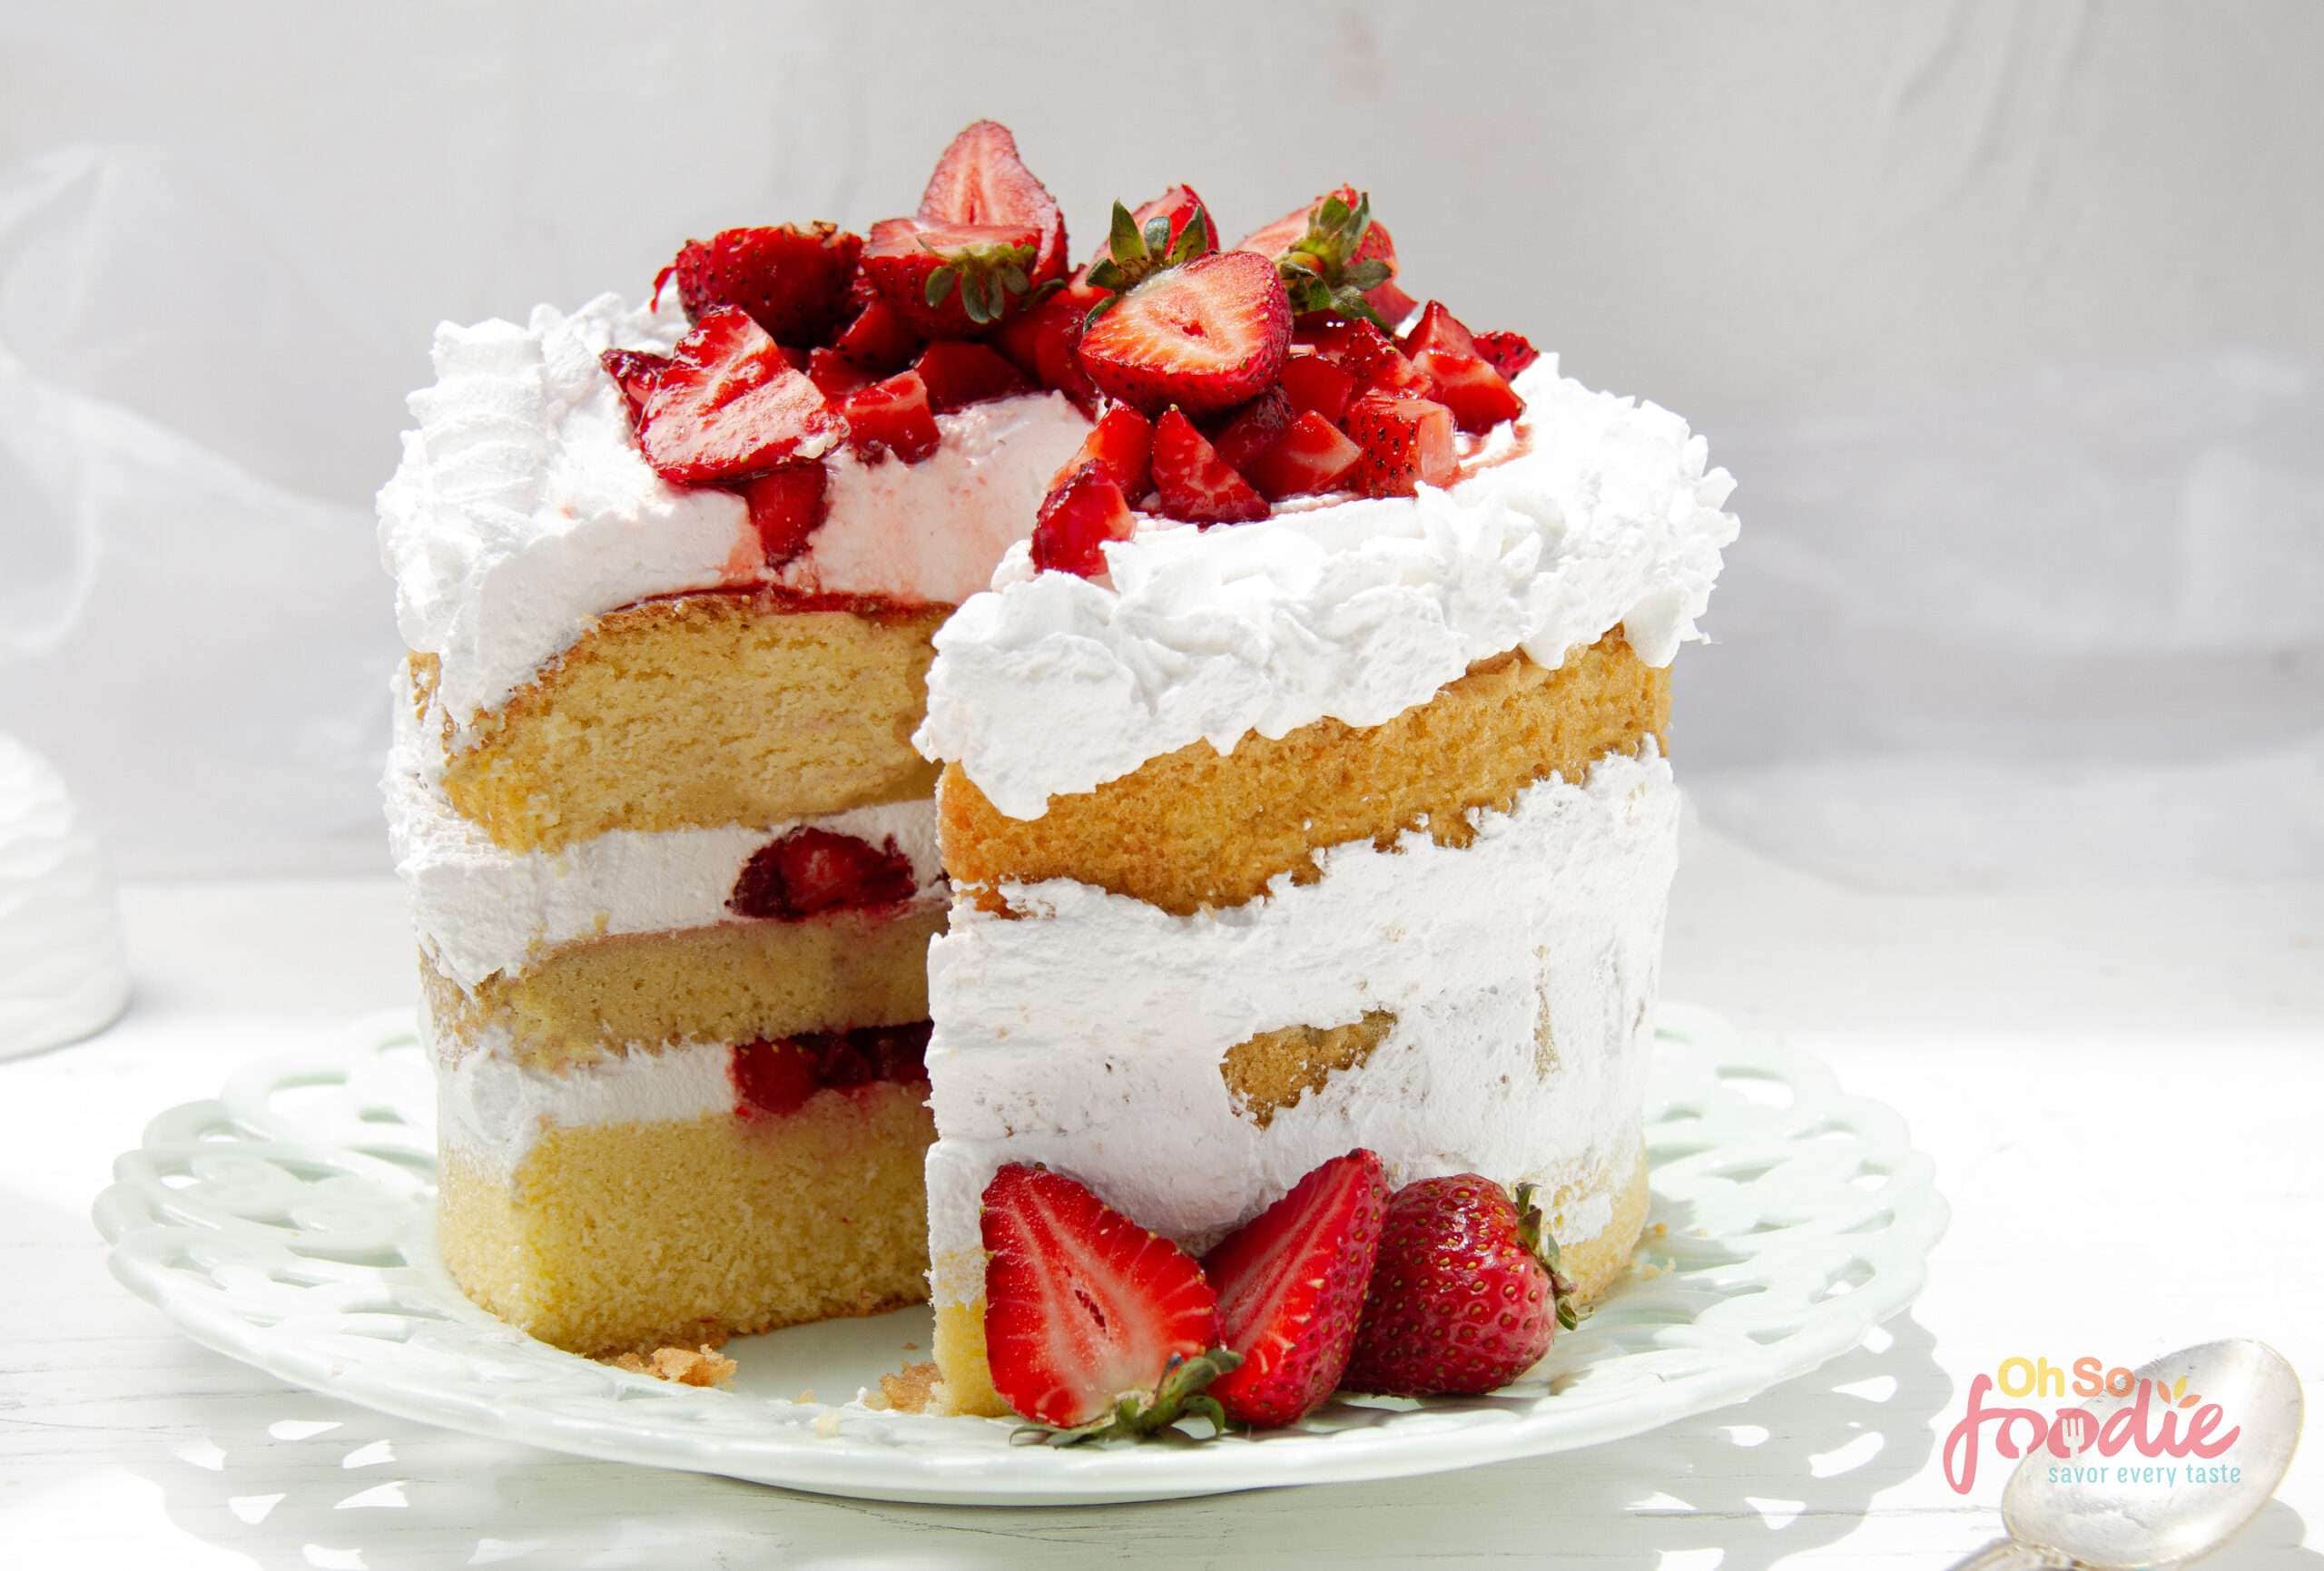
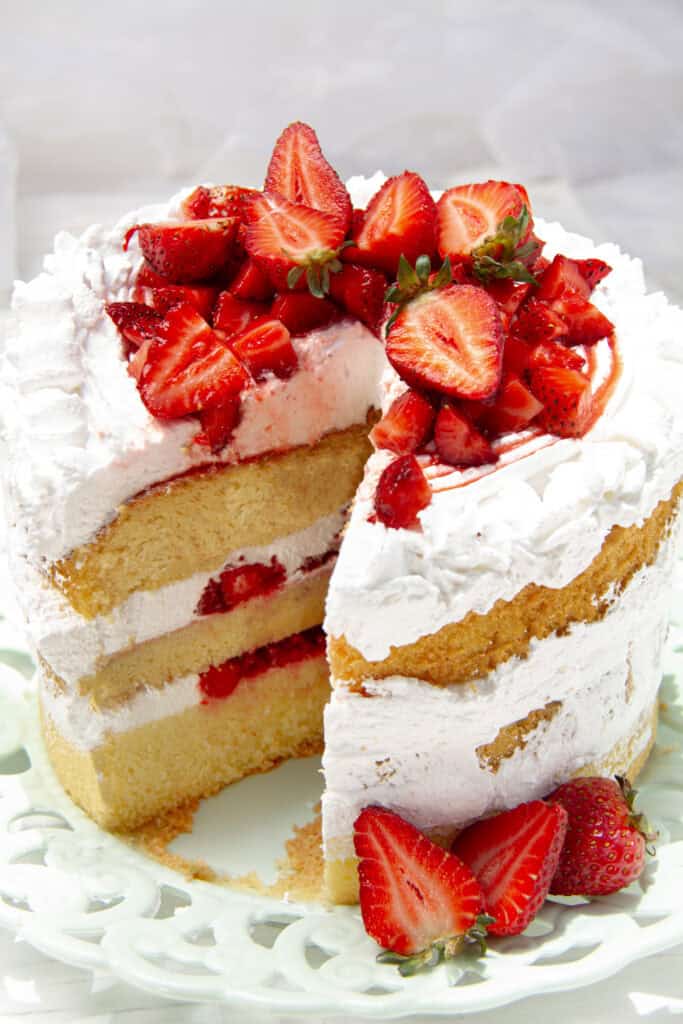
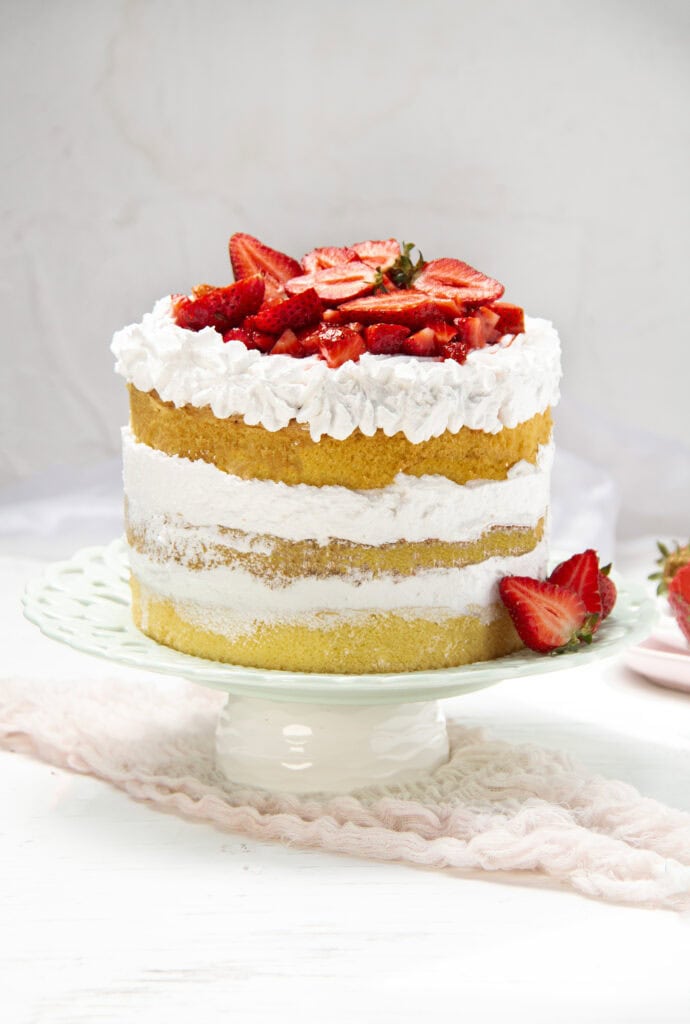
If you’re looking for a yummy dessert that is perfect for summer then my Strawberry Shortcake Cake is exactly what you need! It’s got all the flavors and textures you love from the classic strawberry shortcake, but in the form of the most decadent, layered cake. Think soft, fluffy vanilla cake, amazing homemade whipped cream, and, of course, those juicy, ripe strawberries!
It’s one of the best choices for desert at any summer gathering — you can make this whether you’re hosting a family BBQ, a summer picnic, or simply enjoying a sweet moment by yourself!
I have the worst sweet tooth and so I love cakes, but I don’t usually make them that often. But, I must say, this one came out so good, I think I’m gonna start making more cakes moving forward.
And, trust me when I say you’re going to want a slice (or three) of this sweet, tart, creamy, and fluffy strawberry shortcake cake!
Why This Strawberry Shortcake Cake is the BEST:
- Fluffy and Moist Sponge Cake: My recipe makes the best light and tender cakes. No dry cake here, friends—this one stays moist and delicious! And, once you follow the techniques and tips I’ve shared below and stick to precise measurements, you’ll have a similar light and tender cake too!
- Fresh Strawberries: Some people use frozen strawberries to make this cake but it’s so much better with fresh strawberries!
- Homemade Whipped Cream: If you want a really great strawberry shortcake cake, then don’t even think about using store-bought whipped topping. Your own homemade whipped cream is the best way to go for this recipe! Why? Well, homemade whipped cream is creamy, light, and sweetened just right unlike that overly sweet, heavy store-bought stuff.
- Simple to Make: This cake looks pretty impressive, but the steps are rather straightforward. Plus, there is not need for any fancy techniques or equipment. This means that even though you’re an experienced baker or a newbie, you’ll be able to make my yummy strawberry shortcake cake without any problems – just make sure to reads the instructions and tips carefully.
Recipe Highlights
- It’s a Showstopper!: Lol, but really it is. Look how beautiful it looks! This cake is not only beautiful but makes the perfect dessert for all types of occasions including Mother’s days, Fourth of July, baby showers, birthdays, picnics and you can even make it if you have a sweet tooth and want a nice, casual everyday dessert!
- It’s Perfect for Summer: The light and fluffy cake is great to make during summer time when fresh strawberries are in abundance.
- It Feeds a Crowd: My strawberry shortcake cake makes a generous amount, so it’s great for potlucks, picnics, or any big family gather when you need to feed a crowd! It has 12 servings!
Ready to give it a try? Keep reading!
What Tools I Used to Make This Cake
- Mixing Bowls – These are my new favorite mixing bowls. They’re lightweight, super easy to clean, and you can find this set on Amazon at a really affordable price if you need new ones.
- Hand Mixer – This is my go-to tool for whipping up the cake batter and the homemade whipped cream. Mine is from Amazon and it’s a total workhorse — lightweight but powerful.
- Measuring Cups and Spoons – I use this stainless steel set I grabbed from Amazon, and I love how sturdy they feel compared to plastic ones. They’re also very accurate and accuracy is something you need for this recipe!
- 7-Inch & 9-Inch Springform Cake Pans – You’ll need one good quality 9-inch cake pan and one good quality 7-inch cake pan for this recipe. I use non-stick pans that bake the cake evenly. These are my go to springform pans that I got for a great price on amazon. Check them out if you need some.
- Cooling Rack – Letting the cake layers cool properly is key. I use a simple wire cooling rack that I’ve had for years.
- Offset Spatula – I love using an offset spatula to spread the whipped cream and layer the strawberries neatly as it makes the cake look so much cleaner.
Ingredients You’ll Need: (Precise measurements are essential!)
For the sponge cake:
- 7 large eggs, room temperature (about 50g each without shell)
- 1 cup granulated sugar (200g)
- 1½ cups all-purpose flour (200g), sifted 3x
- ¾ cup unsalted margarine (200g), melted but cooled to room temp
- 2 tbsp cornstarch (16g)
- 1 tsp vanilla extract or 1 tbsp lemon zest (5g)
For the Strawberries:
- ¼ cup granulated sugar (50g) for macerating
- 1 lb strawberries (500g), hulled and diced
For the Whipped Cream:
- 2 cups heavy whipping cream (500ml), chilled overnight
- ½ cup powdered sugar (60g)
- 1 teaspoon vanilla extract (5 ml)
For the Decoration:
- 12 whole strawberries (or halved) for decoration
How to Make This Strawberry Shortcake Cake🍓🍰
⚠️ Important Reminder: This light, airy sponge cake demands precise measurements and delicate handling. Even small changes can cause it to become dense or collapse under the filling, so follow the recipe carefully!
1. Start By Preparing the Cake Layers
First up, we need to get our cake layers ready to go!
- Preheat your oven to 350°F (175°C). Then grease one 9-inch (23cm) and one 7-inch (18cm) round pan.
- In a large mixing bowl, beat eggs and sugar on high speed for 10-12 minutes until tripled in volume —yes, really! We’re aiming for that ribbon stage, where the batter falls slowly and leaves a visible trail.
- Gently fold in sifted flour + cornstarch in three additions using a spatula, making wide, enveloping motions to keep the air in.
- Then drizzle in the melted margarine and vanilla or lemon zest for some extra flavor.
2. Bake Uneven Cake Layers

These springform pans are my go-to for cheesecakes, layered desserts, and deep-dish pies. The easy-release sides make it so simple to get perfect results every time without any stress.
Now, it’s time to get these cakes in the oven!
- Pour ⅔ of the batter into the 9-inch pan and ⅓ into the 7-inch pan.
- Bake for:
- 9-inch cake: 30-32 minutes
- 7-inch cake: 25-28 minutes
- You’ll know they’re done when they spring back when touched. Let them cool in their pans for 5 minutes, then transfer them to wire racks to cool completely.
3. Split the Base Layer
Once the cakes are cool, it’s time to get slicing!
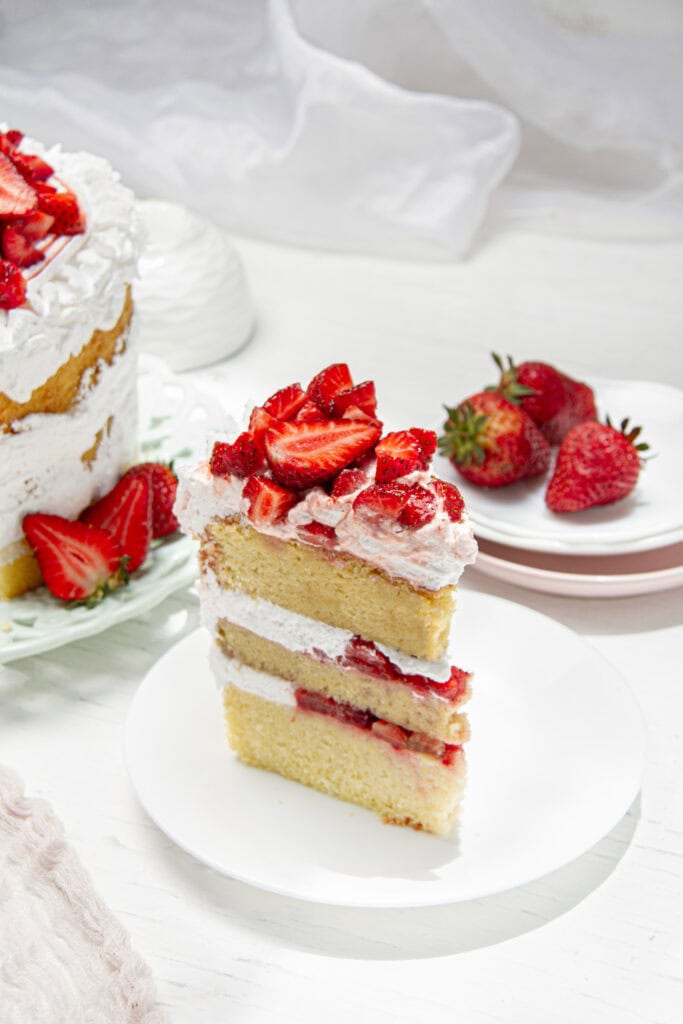
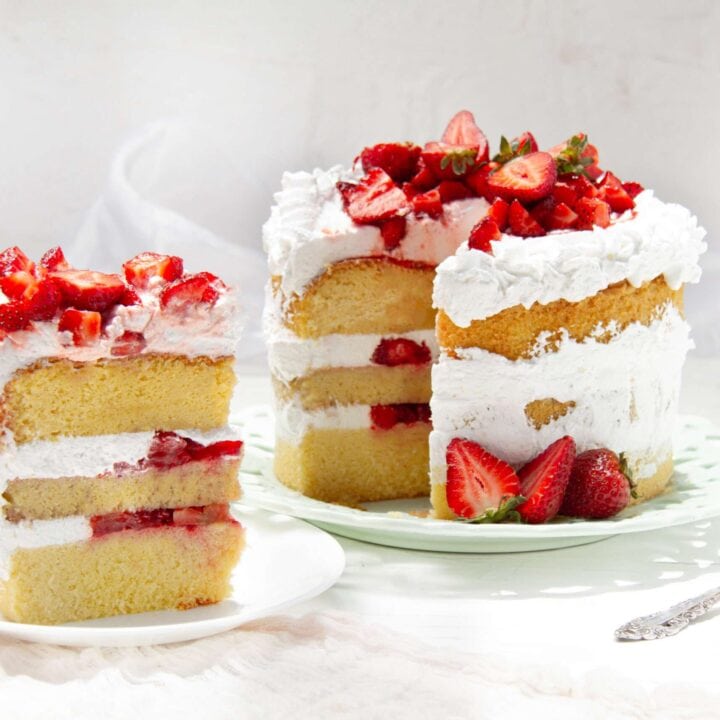
- Using a serrated knife, horizontally split the 9-inch cake into two even layers. Now you’ve got three layers total!
4. Macerate the Strawberries & Whip the Cream
Now for the good stuff—the fresh berries and homemade whipped cream!
- Toss diced strawberries with ¼ cup (50g) sugar and let them sit for 20 minutes. This will release their juices and make them even sweeter. Drain any excess juice.
- Chill your bowl and beaters for 15 minutes, then whip the heavy cream and the powdered sugar to stiff peaks. To do so, pour the chilled heavy cream and vanilla extract into the bowl and beat on medium-low speed for about 2 minutes until slightly thickened. Gradually add the powdered sugar, then increase the speed to medium-high, whipping for 3–4 minutes until stiff peaks form. Stop when the cream holds its shape and forms peaks that stand up without collapsing—be careful not to overwhip, or it may turn grainy or become butter.
5. Assemble the Cake (Make sure the cake is at room temp!)
- Place the bottom 9-inch layer on a plate or cake stand.
- Spread with ⅓ of the whipped cream.
- Spoon half the macerated strawberries over the cream.
- Add the 7-inch layer on top.
- Spread with another ⅓ of the cream.
- Add the rest of the strawberries.
- Top with the split 9-inch layer.
- Frost the entire cake with the remaining whipped cream.
- Decorate with whole strawberries (or slice them in half).
- Drizzle reserved strawberry juice over the top for some extra strawberry flavor.
6. Chill Before Serving
Patience, my friend!
- Pop the cake in the fridge for at least 2 hours before slicing.
- This helps everything set up beautifully and makes for clean, perfect slices when you serve it up.
Very Important Tips & Tricks
🔹 Airy Sponge Success = Precision + Patience
To make sure your cake comes out light and fluffy, you must make sure to stick to precise measurements, mix properly and handle the different components very carefully. To make sure you get it right, here are some essential tips and tricks you show pay attention to so that your cake comes out just right!
- Keep the Ingredients at room temperature (except cream!): Eggs, sugar, flour, and margarine should all be at room temperature before mixing. Room-temperature ingredients are easier to blend and will result in a smoother, more stable cake batter. (As an example, cold eggs won’t whip properly and this is likely to lead to a denser cake. (Tip: If you forget to take the eggs out early, place them in warm (not hot) water for 5-10 minutes or until no longer cold to the touch!)
- Do NOT overmix after adding flour: Over-mixing deflates the whipped eggs and knocks out the air needed for a light sponge. To avoid any of this, use gentle, folding motions instead of stirring. Fold just until combined—a few streaks of flour are better than a deflated batter!
- Cream must be ice-cold (below 40°F/4°C) to whip properly: Warm cream won’t hold its shape and this will lead to a loose, unstable whipped cream. Therefore, I highly recommend that you chill your heavy cream overnight. And for additional benefits, consider chilling the mixing bowl and beaters for 15 minutes before you start whipping. This ensures stiff peaks and a stable, fluffy texture to your homemade whipped cream.
- Assemble the cake at room temperature to prevent condensation: If the cake is too cold when assembling, moisture from condensation can make the layers soggy. Therefore, I suggest that you let the cakes come to room temperature before you start adding the frosting to help the assembled cake maintain its structure.
🔹 Why You MUST Wait to Slice your Cake
- Chilling stabilizes the cream and allows flavors to meld: The just-stacked cake layers are delicate, and the whipped cream filling is sensitive. At least 2 hours of chilling firm up the cream so that it won’t ooze out when cut. Furthermore, the flavors get stronger as the strawberries release their juices and mingle with the layers.
- Cutting too early causes layers to shift: Refrigerating a cake keeps it structured much better. If cut prematurely, the layers will slide and the cream too soft to hold a clean slice. For best clean slices, use a good serrated edge knife and rinse it between cutting!
Pro Tips
- For taller, evenly baked layers: Bake with cake strips (soaked in water and wrapped around the cake pans) for even baking. This will help to prevent domed tops and yields a more uniform height for the cake. If you don’t have cake strips, you can create your own by covering damp paper towels with foil and wrapping them around the pans.
- No margarine? No problem! Substitute with an equal amount of melted and cooled unsalted butter. The cake will taste slightly richer but remain soft and tender.
- Make ahead for easier prep: Save time by baking the cake layers a day in advance. Once cooled, wrap them tightly in plastic wrap and store them at room temperature. This also allows the cake to settle, making it easier to slice and assemble the next day. If making the full cake ahead, refrigerate it overnight and serve chilled for the best texture.
This Strawberry Shortcake Cake is as delicious as it is beautiful. It’s the kind of dessert that’ll have everyone asking for seconds (and maybe thirds!). I sure couldn’t get enough of it!
So, whether you’re making a lovely summer dessert or just craving something sweet on a whim, you cannot go wrong with my strawberry shortcake cake recipe!
Again, please make sure to follow the techniques and tips above. They’ll help you to make the perfect light, stable, and beautifully layered strawberry shortcake cake that won’t crumble! And hey, even if it did crumble (which it won’t!), it’s so delicious you and everyone else who was to eat this cake would still devour every bite. But no worries—your cake’s going to be as stunning as it is tasty! 🍓🍰
Strawberry Shortcake Cake Recipe
If you’re looking for the ultimate dessert that screams “summer,” look no further. This Strawberry Shortcake Cake is a total showstopper! It’s got all the flavors and textures you love from the classic strawberry shortcake, but in the form of a decadent, layered cake!
Ingredients
For the sponge cakes:
- 7 large eggs, room temperature (about 50g each without shells)
- 1 cup granulated sugar (200g)
- 1½ cups all-purpose flour (200g), sifted 3x
- ¾ cup unsalted margarine (200g), melted but cooled to room temp
- 2 tbsp cornstarch (16g)
- 1 tsp vanilla extract or 1 tbsp lemon zest (5g)
For the Strawberries:
- 1 lb strawberries (500g), hulled and diced
- ¼ cup granulated sugar (50g) for macerating
For the Whipped Cream:
- 2 cups heavy whipping cream (500ml), chilled overnight
- ½ cup powdered sugar (60g) only if cream is unsweetened
- 1 tsp vanilla extract (5 ml)
For Decoration
- 12 whole strawberries for decoration
Instructions
1. Prepare the Cake Layers
First up, we need to get our cake layers ready to go!
- Preheat your oven to 350°F (175°C). Grease one 9-inch (23cm) and one 7-inch (18cm) round pan.
- In a large mixing bowl, beat eggs and sugar on high speed for 10-12 minutes until tripled in volume —yes, really! We’re aiming for that ribbon stage, where the batter falls slowly and leaves a visible trail.
- Gently fold in sifted flour + cornstarch in three additions using a spatula, making wide, enveloping motions to keep the air in.
- Drizzle in melted margarine and vanilla or lemon zest for that extra touch of flavor.
2. Bake Uneven Layers
Now, let’s get these cakes in the oven!
- Pour ⅔ of the batter into the 9-inch pan and ⅓ into the 7-inch pan.
- Bake for:
- 9-inch cake: 30-32 minutes
- 7-inch cake: 25-28 minutes
- You’ll know they’re done when they spring back when touched. Let them cool in their pans for 5 minutes, then transfer them to wire racks to cool completely.
3. Split the Base Layer
Once the cakes are cool, it’s time to get slicing!
- Using a serrated knife, horizontally split the 9-inch cake into two even layers. Now you’ve got three layers total!
4. Macerate the Strawberries & Whip the Cream
Now for the good stuff—the fresh berries and dreamy whipped cream!
- Toss diced strawberries with ¼ cup (50g) sugar and let them sit for 20 minutes. This will release their juices and make them even sweeter. Drain any excess juice.
- Chill your bowl and beaters for 15 minutes, then whip the heavy cream (+ a little powdered sugar, if you like) to stiff peaks. Keep it refrigerated until assembly.
5. Assemble This Beauty! (Make sure the cake is at room temp!)
- Place the bottom 9-inch layer on a plate or cake stand.
- Spread with ⅓ of the whipped cream.
- Spoon half the macerated strawberries over the cream.
- Add the 7-inch layer on top.
- Spread with another ⅓ of the cream.
- Add the rest of the strawberries.
- Top with the split 9-inch layer.
- Frost the entire cake with the remaining whipped cream.
- Decorate with whole strawberries.
- Drizzle reserved strawberry juice over the top for an extra punch of flavor.
6. Chill Before Serving
Patience, my friend!
- Pop the cake in the fridge for at least 2 hours before slicing.
- This helps everything set up beautifully and makes for clean, perfect slices when you serve it up.
Notes
- ⚠️ Critical Note: This airy sponge cake requires exact measurements and gentle handling. Even small deviations can result in a dense cake that collapses under the filling.
- ⚠️ Chilling lets the whipped cream stabilize and help he flavors meld together. Cutting your cake too early causes the layers to shift.
- Ingredients at room temperature (except cream!): Eggs, sugar, flour, and margarine should all be at room temperature before mixing. Cold eggs won’t whip properly, leading to a denser cake. Room-temperature ingredients blend more evenly, creating a smoother, stable batter. (Tip: If you forget to take eggs out early, place them in warm (not hot) water for 5-10 minutes or until no longer cold to the touch!)
- Do NOT overmix after adding flour: Overmixing deflates the whipped eggs, knocking out the air needed for a light sponge. Use gentle, folding motions instead of stirring. Fold just until combined—a few streaks of flour are better than a deflated batter!
- Cream must be ice-cold (below 40°F/4°C) to whip properly: Warm cream won’t hold its shape, leading to a loose, unstable filling. Chill the cream overnight, and for best results, chill the mixing bowl and beaters for 15 minutes before whipping. This ensures stiff peaks and a stable, fluffy texture.
Nutrition Information:
Yield: 12 Serving Size: 1 slice (150g)Amount Per Serving: Calories: 491Total Fat: 36gSaturated Fat: 17gTrans Fat: 3gUnsaturated Fat: 17gCholesterol: 176mgSodium: 59mgCarbohydrates: 36gFiber: 2gSugar: 21gProtein: 7g